Comprehensive Guide: Python Application Deployment with Jenkins and Docker on AWS
Introduction: Deploying Python applications with Continuous Integration and Continuous Deployment (CI/CD) pipelines has become standard practice for modern development teams. In this detailed guide, we'll walk through the process of deploying a Python-based application using Jenkins as the CI/CD tool and Docker for containerization. We'll also leverage AWS for hosting our application.
GitHub Repository: Find the complete source code and resources used in this guide on our
GitHub repository: GitHub Repository
Step-by-Step Guide:
Step 1 — Launch an AWS EC2 Instance:
Log in to the AWS Management Console.
Navigate to the EC2 service.
Click on "Launch Instance" to initiate the instance creation process.
Choose an appropriate Amazon Machine Image (AMI), such as Ubuntu.
Select the instance type, opting for a T2 Large instance.
Configure instance details, including network settings, subnet, and security group.
Add storage as per requirements.
Optionally, configure additional details like tags.
Review the instance configuration and click "Launch."
Create a new key pair or select an existing one for SSH access.
Once the instance is launched, note down the public IP address for future access.

Step 2 — Install Jenkins, Docker, and Trivy:
Connect to the EC2 instance using SSH.
Update the package repository using the command
sudo apt update.Create a script file, e.g.,
install_dependencies.sh, and add commands to install Jenkins, Docker, and Trivy.Execute the script using
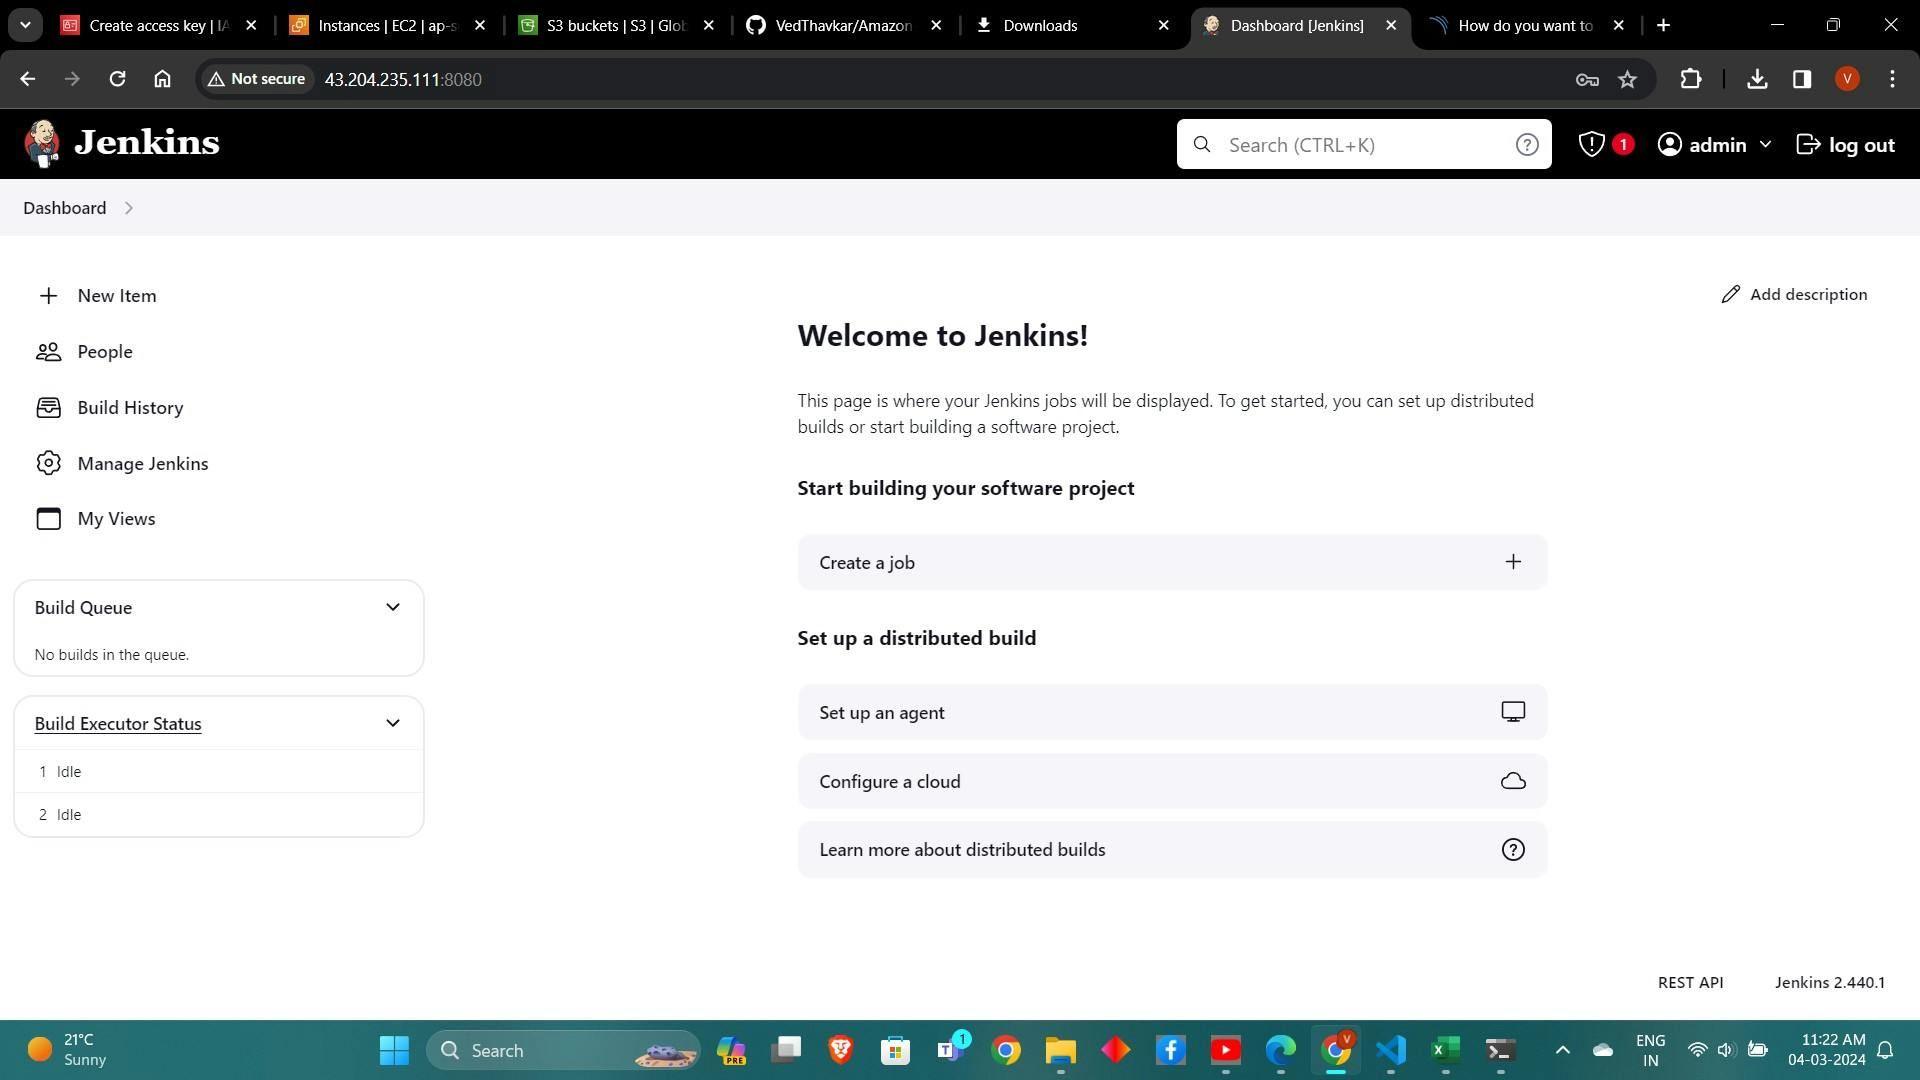
sudo bash install_dependencies.sh.Verify the installation of Jenkins by accessing the Jenkins dashboard via the public IP address of the EC2 instance on port 8080.
Start the Docker service using
sudo systemctl start docker.Verify the Docker installation by running
docker --versionanddocker ps.Pull the SonarQube Docker image using
docker pull sonarqube:lts-community.Run the SonarQube container using
docker run -d --name sonar -p 9000:9000 sonarqube:lts-community.Access SonarQube via the public IP address of the EC2 instance on port 9000 and configure it as required.
To install jenkins
sudo vi jenkins.sh
#enter the below code
#!/bin/bash
sudo apt update -y
#sudo apt upgrade -y
wget -O - https://packages.adoptium.net/artifactory/api/gpg/key/public | tee /etc/apt/keyrings/adoptium.asc
echo "deb [signed-by=/etc/apt/keyrings/adoptium.asc] https://packages.adoptium.net/artifactory/deb $(awk -F= '/^VERSION_CODENAME/{print$2}' /etc/os-release) main" | tee /etc/apt/sources.list.d/adoptium.list
sudo apt update -y
sudo apt install temurin-17-jdk -y
/usr/bin/java --version
curl -fsSL https://pkg.jenkins.io/debian-stable/jenkins.io-2023.key | sudo tee \
                  /usr/share/keyrings/jenkins-keyring.asc > /dev/null
echo deb [signed-by=/usr/share/keyrings/jenkins-keyring.asc] \
                  https://pkg.jenkins.io/debian-stable binary/ | sudo tee \
                              /etc/apt/sources.list.d/jenkins.list > /dev/null
sudo apt-get update -y
sudo apt-get install jenkins -y
sudo systemctl start jenkins
sudo systemctl status jenkins
sudo chmod 777 jenkins.sh ./jenkins.sh # this will installl jenkinsto install docker
sudo apt-get update
sudo apt-get install docker.io -y
sudo usermod -aG docker $USER
sudo chmod 777 /var/run/docker.sock
sudo docker ps
to install trivy
sudo apt-get install wget apt-transport-https gnupg lsb-release -y

wget -qO - https://aquasecurity.github.io/trivy-repo/deb/public.key | gpg --dearmor | sudo tee /usr/share/keyrings/trivy.gpg > /dev/null

echo "deb [signed-by=/usr/share/keyrings/trivy.gpg] https://aquasecurity.github.io/trivy-repo/deb $(lsb_release -sc) main" | sudo tee -a /etc/apt/sources.list.d/trivy.list

sudo apt-get update

sudo apt-get install trivy -y
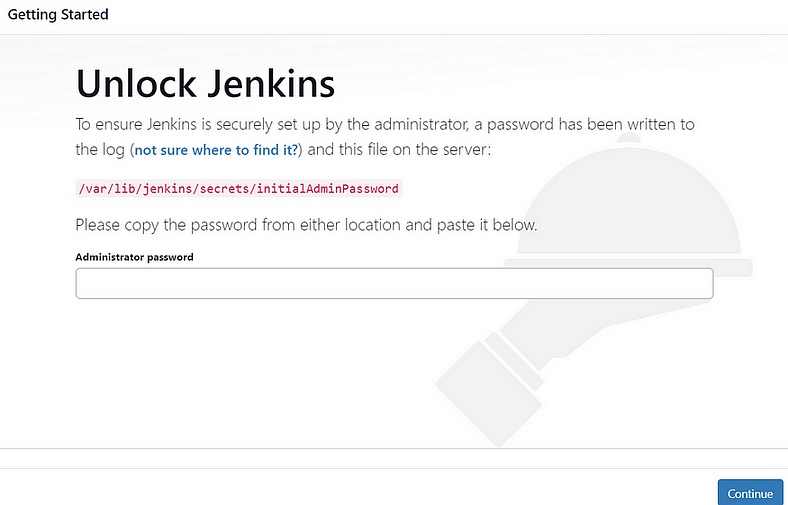
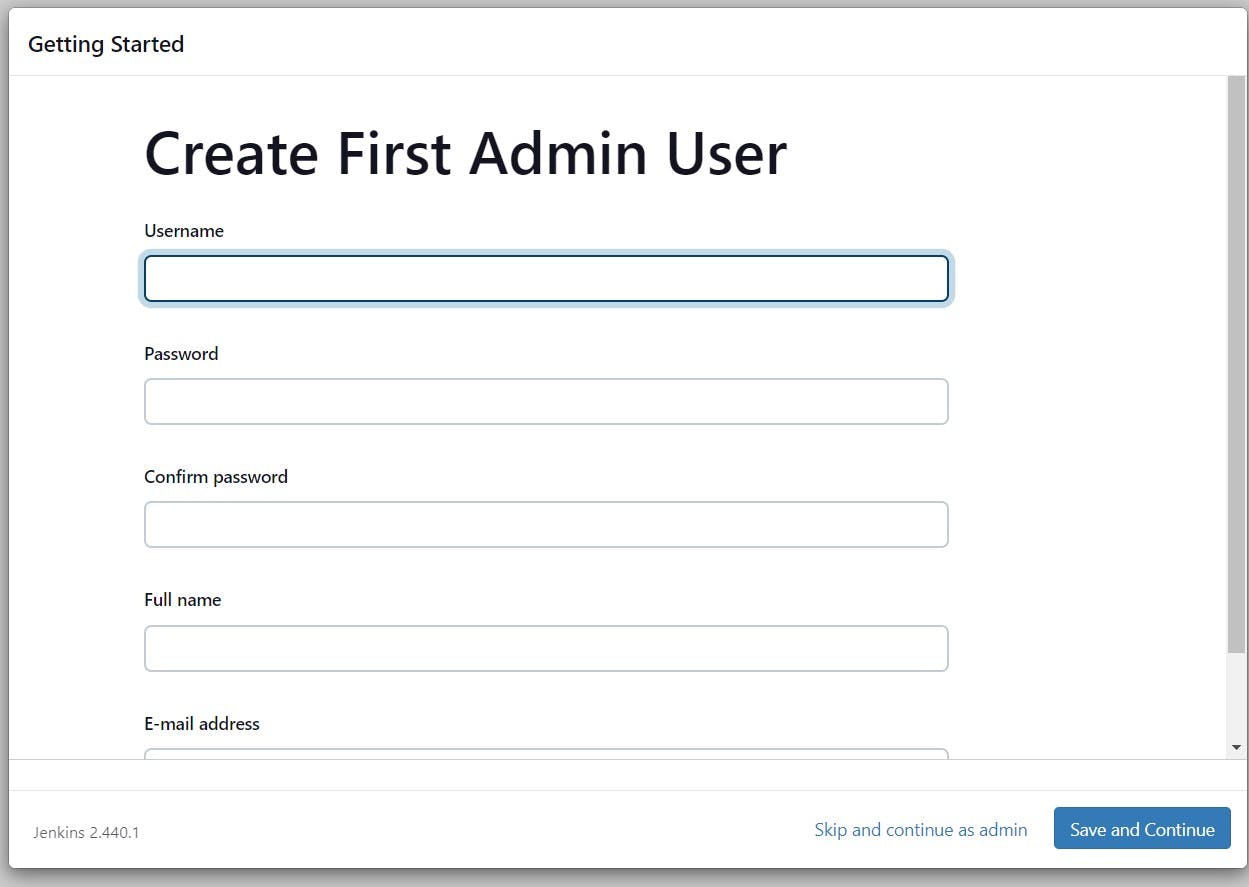
Unlock Jenkins using an administrative password and install the required plugins.
Jenkins will now get installed and install all the libraries.

docker run -d --name sonar -p 9000:9000 sonarqube:lts-community
Now our sonarqube is up and running
Enter username and password, click on login and change password
username admin
password admin

Step 3 — Install and Configure Plugins:
Access the Jenkins dashboard and navigate to "Manage Jenkins" > "Manage Plugins."
Switch to the "Available" tab and search for the required plugins: JDK, SonarQube Scanner, OWASP Dependency Check.

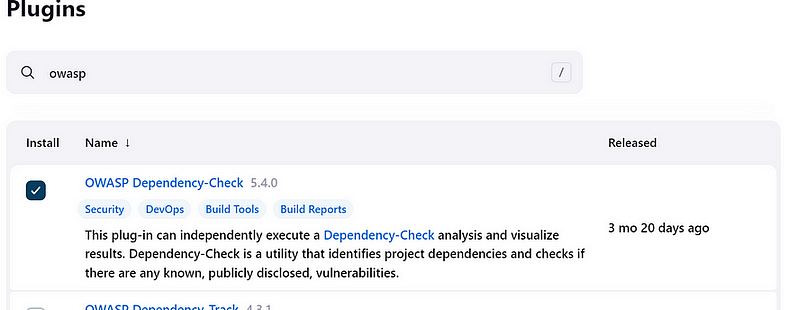
Check the boxes next to the desired plugins and click "Install without restart."
Once installed, navigate to "Manage Jenkins" > "Global Tool Configuration."
Under the "JDK" section, click "Add JDK" and specify the JDK installation path.

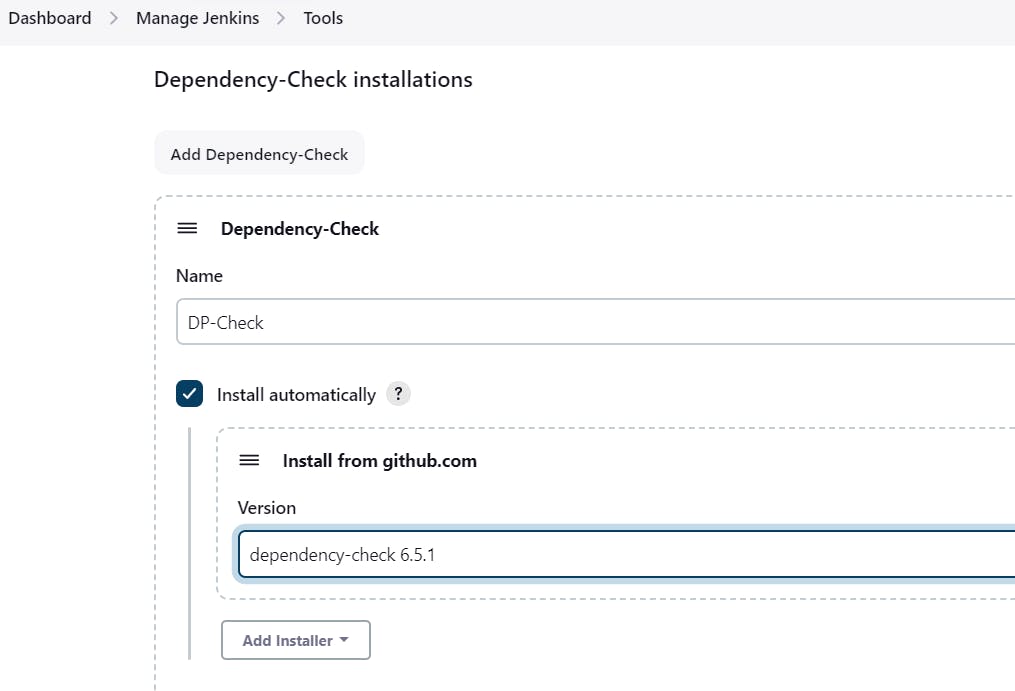
Similarly, configure SonarQube Scanner and OWASP Dependency Check by providing installation paths.
Click "Save" to apply the changes.
Step 4 — Configure SonarQube Server:
Access the SonarQube dashboard and navigate to "Administration" > "Security" > "Users."

Click on your user account and select "Tokens" from the left menu.
Generate a new token by providing a name and clicking "Generate."

Copy the generated token for later use in Jenkins.
In Jenkins, navigate to "Manage Jenkins" > "Manage Credentials."
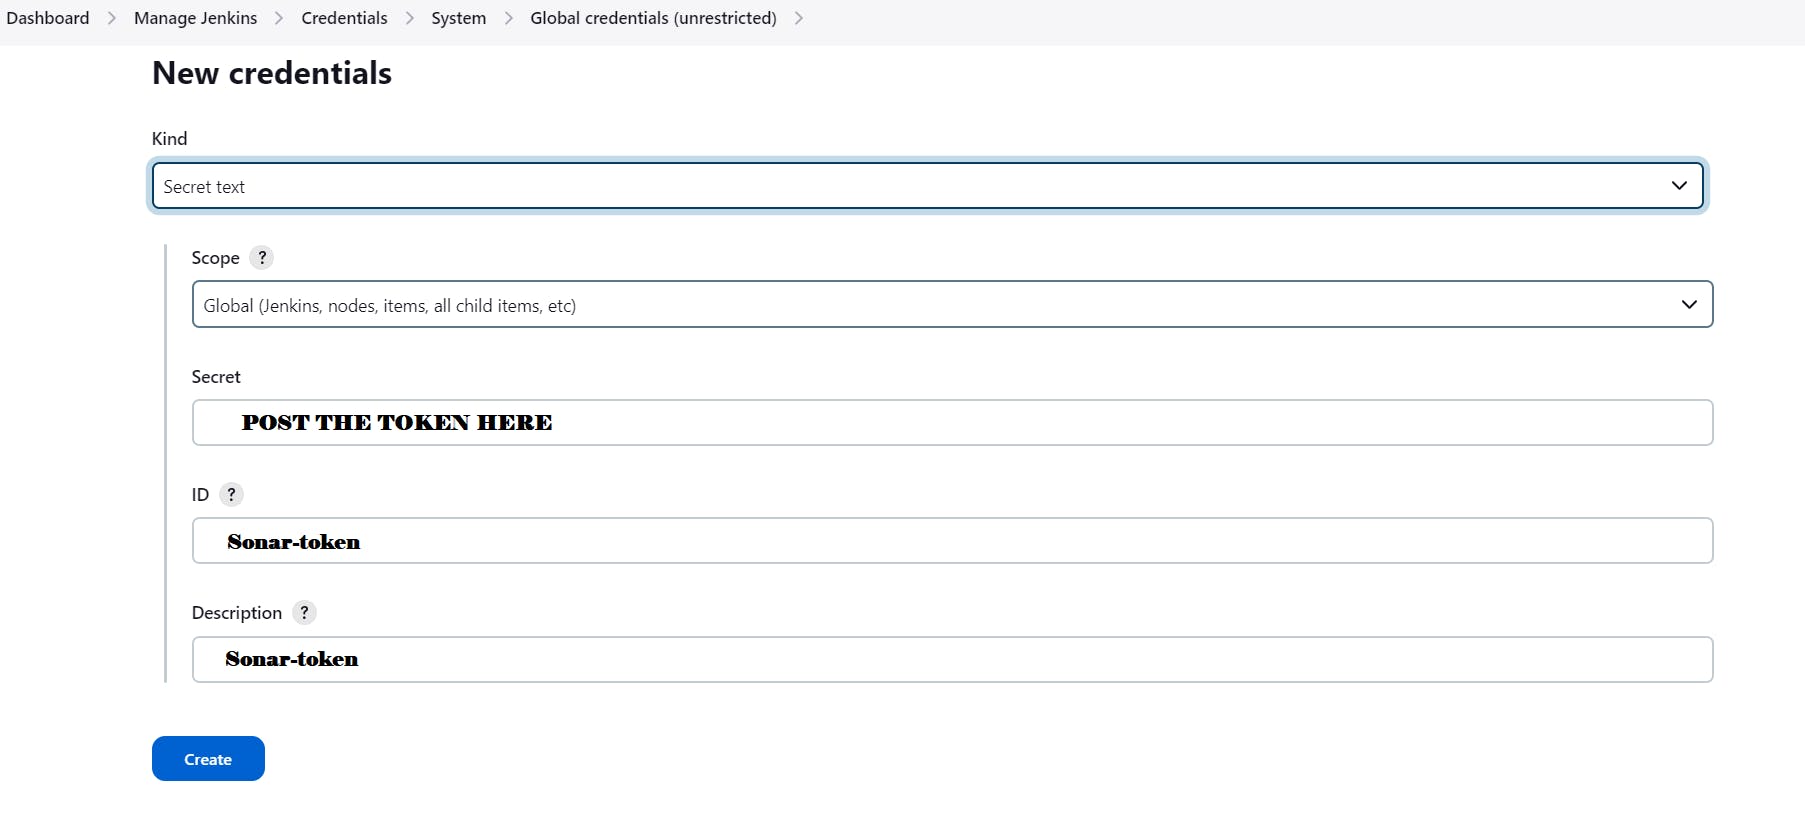
Click on "Add Credentials" and select "Secret text" as the credential type.
Paste the SonarQube token in the "Secret" field and provide an ID for the credential.
In the Jenkins pipeline script, use the credentials ID to authenticate with SonarQube for code analysis.
Now, go to Dashboard → Manage Jenkins → Configure System
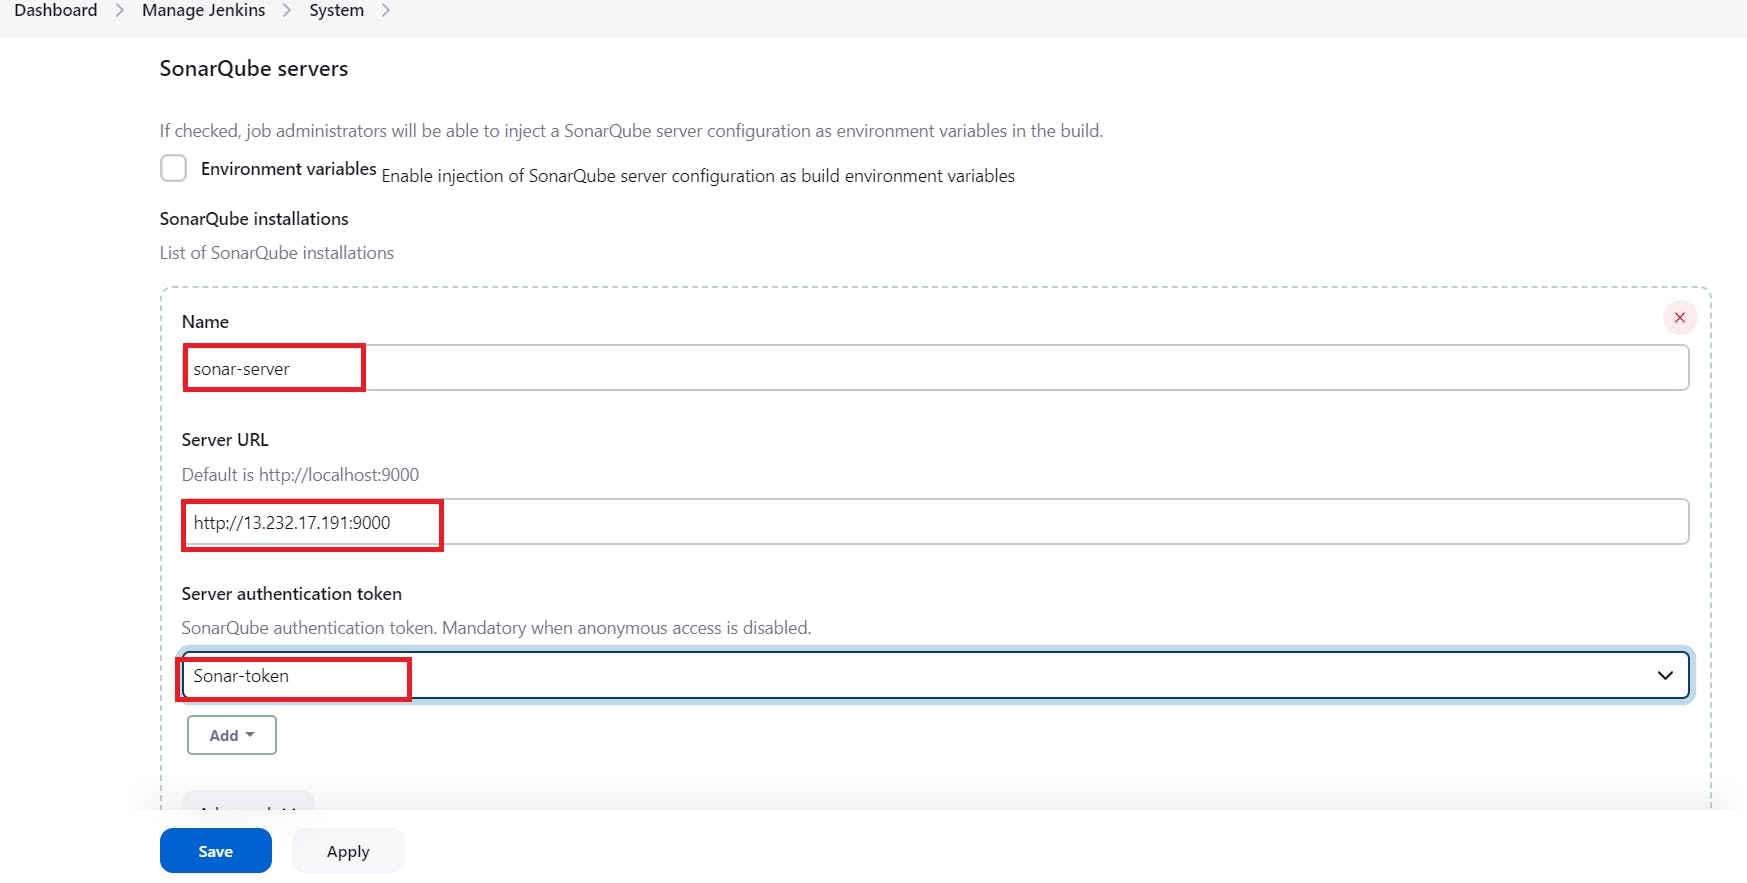
Click on Apply and Save
The Configure System option is used in Jenkins to configure different server
Global Tool Configuration is used to configure different tools that we install using Plugins
We will install a sonar scanner in the tools.

In the Sonarqube Dashboard add a quality gate also
Administration–> Configuration–>Webhooks


Add details
#in url section of quality gate
<http://jenkins-public-ip:8080>/sonarqube-webhook/

Step 5 — Create a Jenkins Pipeline:
Click on "New Item" to create a new Jenkins job.
Enter a suitable name for the job and select "Pipeline" as the project type.
Scroll down to the Pipeline section and define the pipeline script using the Declarative Pipeline syntax.
Define stages for each step of the deployment process, including checkout from Git, SonarQube analysis, Docker image build, etc.
Save the pipeline configuration.
 pipeline{
     agent any
     tools{
         jdk 'jdk17'
     }
     environment {
         SCANNER_HOME=tool 'sonar-scanner'
     }
     stages {
         stage('clean workspace'){
             steps{
                 cleanWs()
             }
         }
         stage('Checkout From Git'){
             steps{
                 git branch: 'main', url: 'https://github.com/Aj7Ay/Python-System-Monitoring.git'
             }
         }
         stage("Sonarqube Analysis "){
             steps{
                 withSonarQubeEnv('sonar-server') {
                     sh ''' $SCANNER_HOME/bin/sonar-scanner -Dsonar.projectName=Python-Webapp \
                     -Dsonar.projectKey=Python-Webapp '''
                 }
             }
         }
         stage("quality gate"){
            steps {
                 script {
                     waitForQualityGate abortPipeline: false, credentialsId: 'Sonar-token'
                 }
             }
         }
         stage("TRIVY File scan"){
             steps{
                 sh "trivy fs . > trivy-fs_report.txt"
             }
         }
         stage("OWASP Dependency Check"){
             steps{
                 dependencyCheck additionalArguments: '--scan ./ --format XML ', odcInstallation: 'DP-Check'
                 dependencyCheckPublisher pattern: '**/dependency-check-report.xml'
             }
         }
     }
 }
Click on Build now, you will see the stage view like this
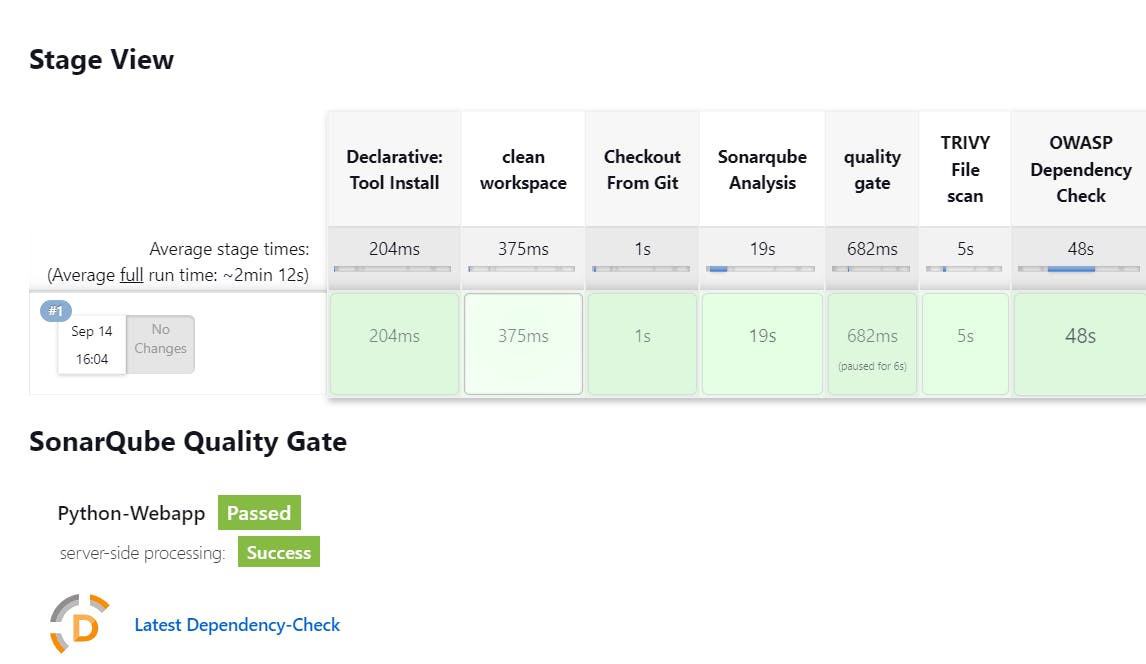
To see the report, you can go to Sonarqube Server and go to Projects.

Step 6 — Install Make Package:
Install the "make" package on the Ubuntu instance using the command
sudo apt install make.sudo apt install make # to check version install or not make -vVerify the installation by running
make -v.
Step 7 — Docker Image Build and Push:
We need to install the Docker tool in our system, Goto Dashboard → Manage Plugins → Available plugins → Search for Docker and install these plugins
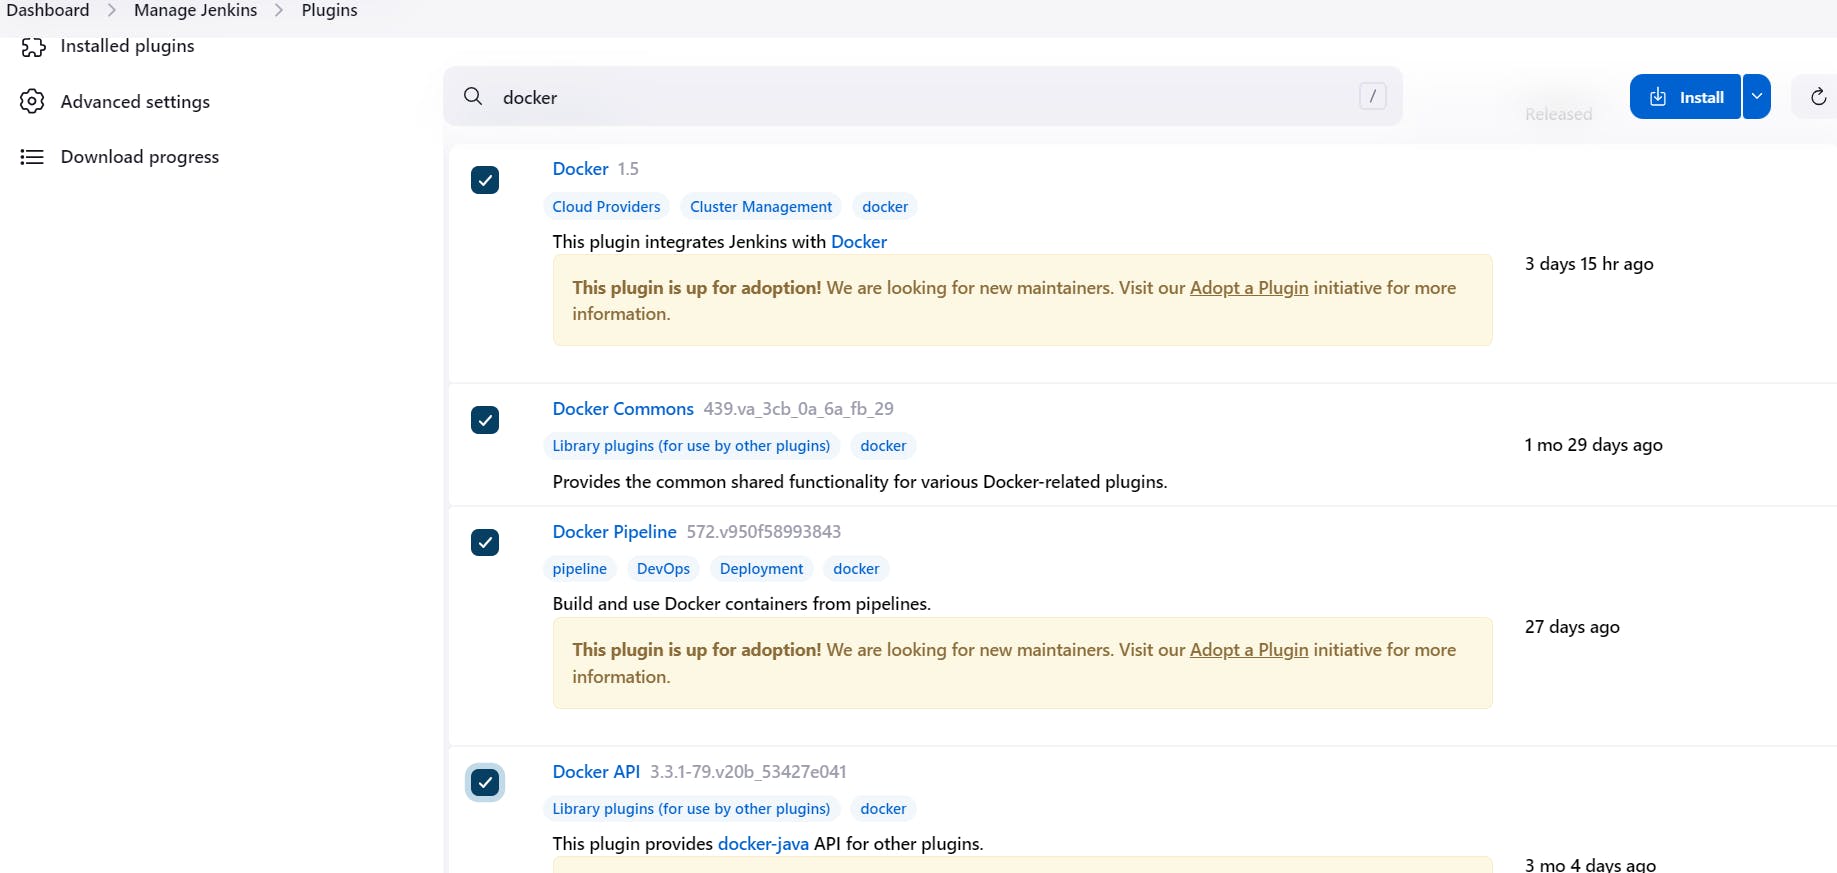
Now, goto Dashboard → Manage Jenkins → Tools →

Access the Jenkins dashboard and navigate to the pipeline job created earlier.
Configure the DockerHub credentials in Jenkins under "Manage Jenkins" > "Manage Credentials."
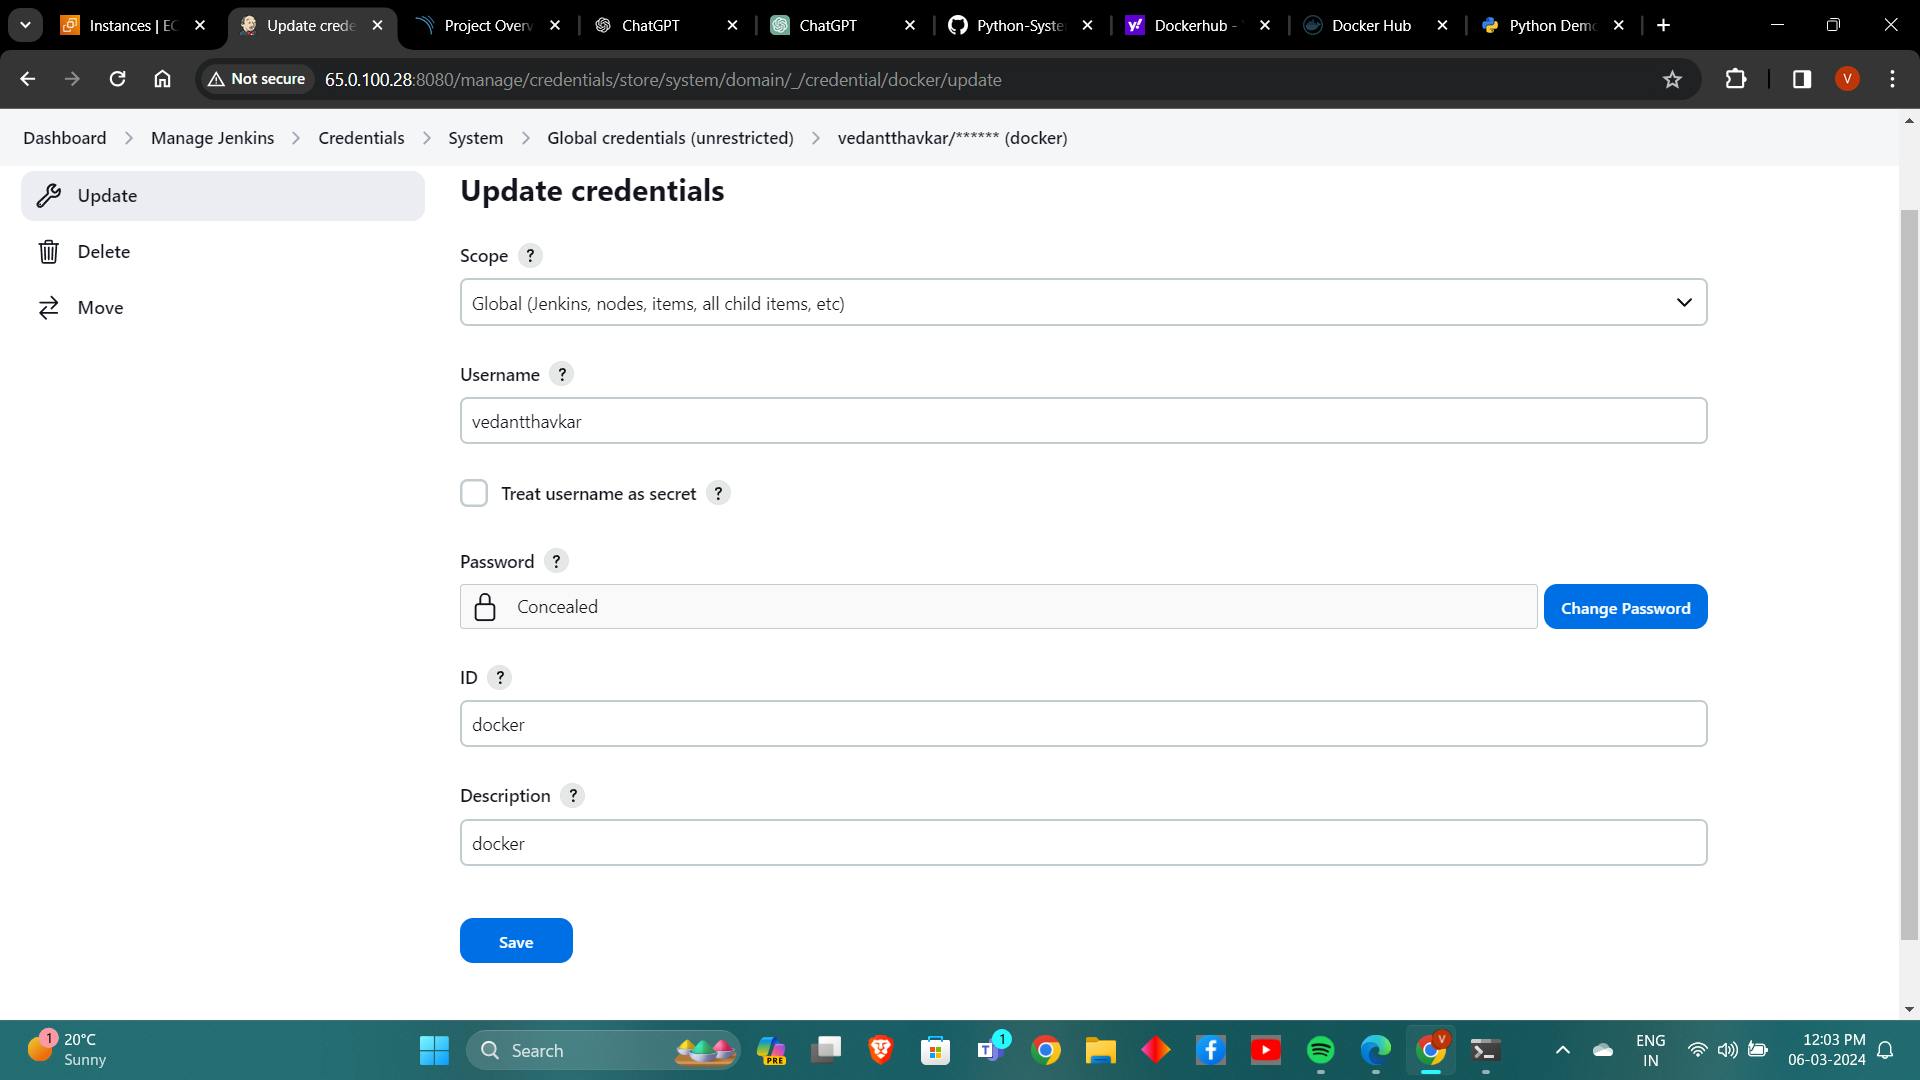
Define stages in the Jenkins pipeline script for building, tagging, and pushing Docker images to DockerHub.
```bash
stage("Docker Build & tag"){
steps{
script{
withDockerRegistry(credentialsId: 'docker', toolName: 'docker'){
sh "make image"
}
}
}
}
stage("TRIVY"){
steps{
sh "trivy image sevenajay/python-system-monitoring:latest > trivy.txt"
}
}
stage("Docker Push"){
steps{
script{
withDockerRegistry(credentialsId: 'docker', toolName: 'docker'){
sh "make push"
}
}
}
}
5. Use the DockerHub credentials ID for authentication during image push.

stage view

Step 8 — Deploy the Docker Image:
1. Add a deployment stage to the Jenkins pipeline script for deploying the Docker image to a container.
```bash
stage("Deploy to container"){
steps{
sh "docker run -d --name python1 -p 5000:5000 sevenajay/python-system-monitoring:latest"
}
}
Define the necessary Docker commands to run the container, specifying the port mapping and container name.
You will see the Stage View like this,

(Add port 5000 to Security Group)
The final script looks like this,
 pipeline{
     agent any
     tools{
         jdk 'jdk17'
     }
     environment {
         SCANNER_HOME=tool 'sonar-scanner'
     }
     stages {
         stage('clean workspace'){
             steps{
                 cleanWs()
             }
         }
         stage('Checkout From Git'){
             steps{
                 git branch: 'main', url: 'https://github.com/Aj7Ay/Python-System-Monitoring.git'
             }
         }
         stage("Sonarqube Analysis "){
             steps{
                 withSonarQubeEnv('sonar-server') {
                     sh ''' $SCANNER_HOME/bin/sonar-scanner -Dsonar.projectName=Python-Webapp \
                     -Dsonar.projectKey=Python-Webapp '''
                 }
             }
         }
         stage("quality gate"){
            steps {
                 script {
                     waitForQualityGate abortPipeline: false, credentialsId: 'Sonar-token'
                 }
             }
         }
         stage("TRIVY File scan"){
             steps{
                 sh "trivy fs . > trivy-fs_report.txt"
             }
         }
         stage("OWASP Dependency Check"){
             steps{
                 dependencyCheck additionalArguments: '--scan ./ --format XML ', odcInstallation: 'DP-Check'
                 dependencyCheckPublisher pattern: '**/dependency-check-report.xml'
             }
         }
         stage("Docker Build & tag"){
             steps{
                 script{
                    withDockerRegistry(credentialsId: 'docker', toolName: 'docker'){
                        sh "make image"
                     }
                 }
             }
         }
         stage("TRIVY"){
             steps{
                 sh "trivy image sevenajay/python-system-monitoring:latest > trivy.txt"
             }
         }
         stage("Docker Push"){
             steps{
                 script{
                    withDockerRegistry(credentialsId: 'docker', toolName: 'docker'){
                        sh "make push"
                     }
                 }
             }
         }
         stage("Deploy to container"){
             steps{
                 sh "docker run -d --name python1 -p 5000:5000 sevenajay/python-system-monitoring:latest"
             }
         }
     }
 }
Step 9 — Access the Real-World Application:
Retrieve the public IP address of the Jenkins instance and access the deployed application using the specified port.
<public-ip of jenkins:5000>Interact with the application to validate its functionality and accessibility.
Step 10 — Terminate the AWS EC2 Instance:
Log in to the AWS Management Console and navigate to the EC2 service.
Locate the EC2 instance used for deployment.
Select the instance and choose the "Terminate" action.
Confirm the termination to stop the instance and avoid unnecessary charges.
Conclusion: By following these detailed steps, you've successfully deployed a Python application using Jenkins and Docker on AWS. This comprehensive guide equips you with the knowledge and practical skills needed to master deployment workflows in real-world scenarios. Happy Deploying!