Deploying a Three-Tier Application on AWS with Kubernetes - A Step-by-Step Guide


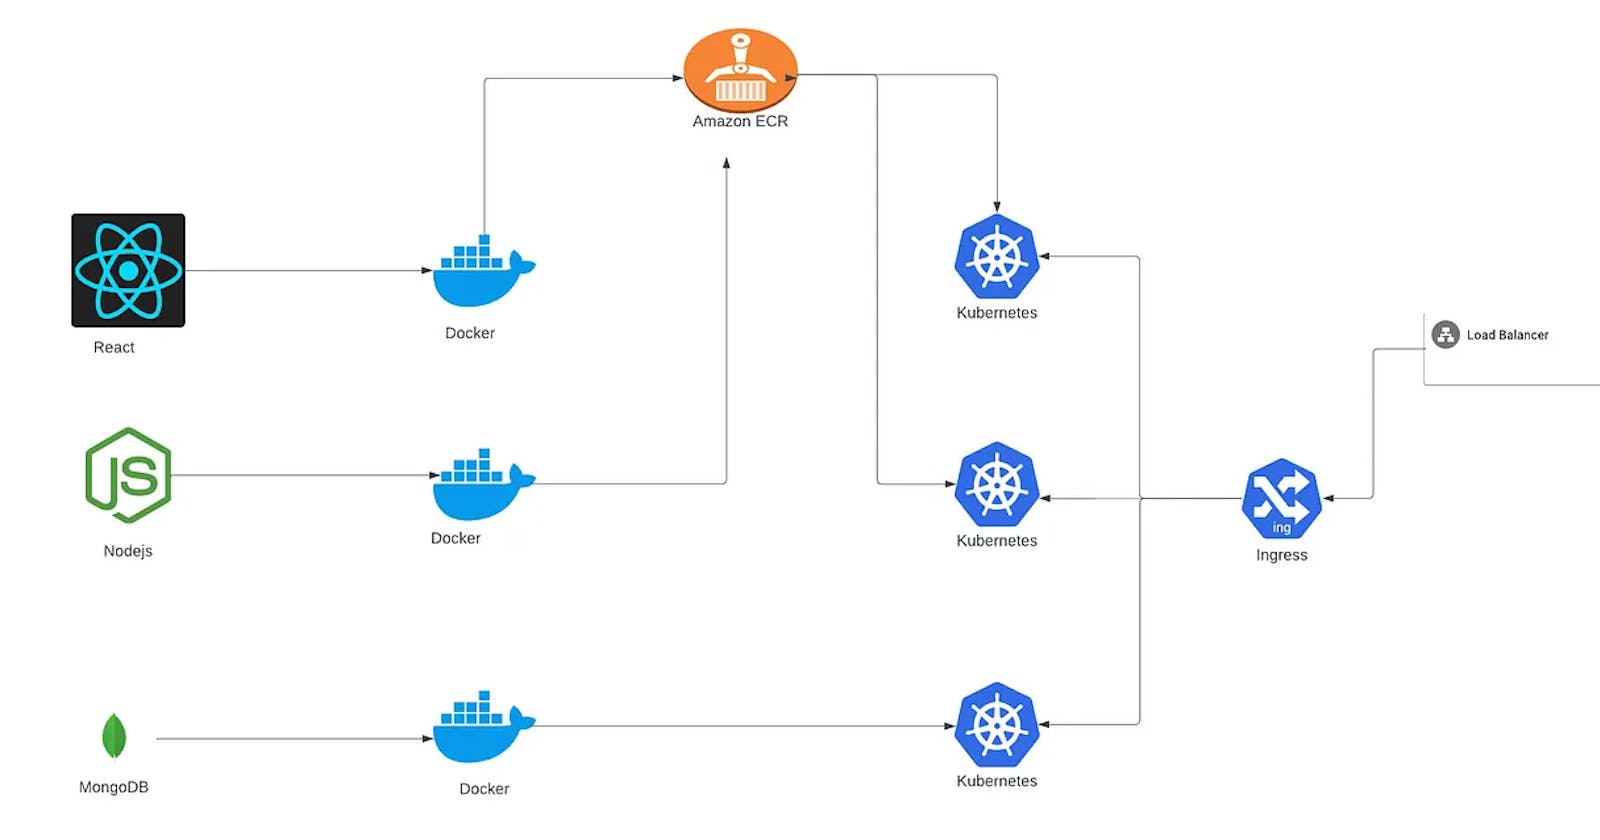
In this tutorial, we'll embark on a journey to deploy a three-tier application on AWS using Kubernetes. This comprehensive guide will walk you through each step, ensuring a smooth deployment process.
Step 1: Launch an EC2 Instance
1.1 Create an EC2 Instance
Navigate to the AWS Management Console by visiting AWS Console.
Click on "Services" and select "EC2" under the "Compute" section to access the EC2 Dashboard.
Click on "Launch Instance" and follow the wizard to create an instance.
Choose an Amazon Machine Image (AMI) (e.g., UBUNTU AMI).
Select an instance type (e.g., t2.micro).
Configure instance details, including network settings and security groups. Ensure to open inbound port 3000 to allow traffic to your application.
Review and launch the instance.

1.2 Connect to the Instance
Once your instance is running, select it from the EC2 dashboard.
Click on "Connect" to get instructions on how to connect using SSH.
Use the provided SSH command (e.g.,
ssh -i key.pem ec2-user@public-ip) to connect to your instance.
Step 2: Clone the Repository
2.1 Clone the Repository
Open a terminal on your EC2 instance.
Run the following commands:
 git clone https://github.com/VedThavkar/TWSThreeTierAppChallenge
 cd TWSThreeTierAppChallenge
Step 3: Dockerize the Frontend
3.1 Install Docker
Update package lists:
sudo apt-get updateInstall Docker:
 sudo apt install docker.io
 sudo chown $USER /var/run/docker.sock
3.2 Create Dockerfile for Frontend
Create a Dockerfile for the frontend application using your favorite text editor.
 #Dockerfile
 # Example Dockerfile
 FROM node:14
 WORKDIR /usr/src/app
 COPY package*.json ./
 RUN npm install
 COPY . .
 CMD ["npm", "start"]
3.3 Build and Run the Docker Image
Build the Docker image:
docker build -t threetier-frontend:latest .
Run the Docker container:
docker run -d -p 3000:3000 threetier-frontend:latest
3.4 Test the Frontend
Open your web browser and navigate to
http://<EC2-public-ip>:3000.Verify that the frontend application is running successfully.
we have done with the frontend testing, now for the time being we can kill the container.
Next step is to install AWS CLI, but for that we need a user. So, we will navigate to the IAM service and create a user there with Administrator access. and 16. Create Security Credentials for AWS CLI.

Step 4: Install AWS CLI and Push Frontend Image to ECR
4.1 Install AWS CLI
Install the AWS CLI on your EC2 instance.
 curl "https://awscli.amazonaws.com/awscli-exe-linux-x86_64.zip" -o "awscliv2.zip"
 sudo apt install unzip
 unzip awscliv2.zip
 sudo ./aws/install -i /usr/local/aws-cli -b /usr/local/bin --update
Configure the AWS CLI:
aws configure
Follow the prompts to enter your AWS credentials, default region, and output format.
4.2 Create ECR Repository
Open the AWS Management Console.
Navigate to Amazon ECR and click "Create repository".
Enter a repository name and create the repository.

4.3 Push Frontend Image to ECR
Follow the ECR instructions to log in to the registry.

Push the frontend Docker image to the ECR repository.


Step 5: Dockerize the Backend
5.1 Create Dockerfile for Backend
In your terminal on the EC2 instance, navigate to the backend directory of your cloned repository.
Create a Dockerfile for the backend application using a text editor:
 #Dockerfile
 # Example Dockerfile
 FROM node:14
 WORKDIR /usr/src/app
 COPY package*.json  ./
 RUN npm install
 COPY . .
 CMD ["node", "index.js"]
5.2 Build and Run the Docker Image
Build the Docker image for the backend:
docker build -t threetier-backend:latest .Run the Docker container for the backend:
docker run -d -p 8080:8080 threetier-backend:latest
5.3 Push Backend Image to ECR
Follow similar steps as in Step 4.2 to create a new repository in Amazon ECR for the backend Docker image.

Push the backend Docker image to the newly created ECR repository.


Step 6: Set Up Kubernetes Cluster
6.1 Install kubectl and eksctl
Download and install
kubectlon your EC2 instance:curl -o kubectl https://amazon-eks.s3.us-west-2.amazonaws.com/1.19.6/2021-01-05/bin/linux/amd64/kubectl chmod +x ./kubectl sudo mv ./kubectl /usr/local/bin kubectl version --short --client
Download and install
eksctlon your EC2 instance:curl --silent --location "https://github.com/weaveworks/eksctl/releases/latest/download/eksctl_$(uname -s)_amd64.tar.gz" | tar xz -C /tmp sudo mv /tmp/eksctl /usr/local/bin eksctl version
6.2 Create EKS Cluster
Use
eksctlto create an Amazon EKS cluster:eksctl create cluster --name three-tier-cluster --region us-east-1 --node-type t2.medium --nodes-min 2 --nodes-max 2This command will deploy a stack over AWS CloudFormation. Cluster creation may take around 15 to 20 minutes.

This will create the Stack. As well as all the required resources such as two EC2 nodes, Elastic Kubernetes Service etc.

Step 7: Deploy Kubernetes Manifests
7.1 Create Namespace
Use
kubectlto create a Kubernetes namespace for the application:kubectl create namespace workshop
7.2 Deploy Manifests
Apply the Kubernetes manifest files provided in the repository to deploy the application components:
 kubectl apply -f k8s_manifests/deploy.yaml
 kubectl apply -f k8s_manifests/secrets.yaml
 kubectl apply -f k8s_manifests/service.yaml
 kubectl apply -f k8s_manifests/backend-deployment.yaml


Now, we have two tiers ready with us, i.e. mongodb and backend. We will run the following command to check it:
kubectl get pods -n workshop
Now, we will check the logs of backend pod again, as last time it wasn’t connecting to the database. And Boom!!! It is listening to port 8080.
kubectl logs api-586c7b87fd-jslff -n workshop
Now, we will work on frontend tier pod, and we will create deployment as well as service for the same.

Now, we will check the pod count, with following command
kubectl get pods -n workshop

Step 8: Install Application Load Balancer (ALB) Controller
if we need to do internal routing then we will use Ingress controller. We will install HELM package manager that will include the Kubernetes manifest files to create ingress controller.
We will now install Application Load Balancer (to access it from the internet) in EKS Cluster with the help of eksctl.
We need an account to perform the installation for that we will install the AWS IAM policy by running the command:
curl -O https://raw.githubusercontent.com/kubernetes-sigs/aws-load-balancer-controller/v2.5.4/docs/install/iam_policy.json
aws iam create-policy --policy-name AWSLoadBalancerControllerIAMPolicy --policy-document file://iam_policy.json
eksctl utils associate-iam-oidc-provider --region=us-west-2 --cluster=three-tier-cluster --approve
eksctl create iamserviceaccount --cluster=three-tier-cluster --namespace=kube-system --name=aws-load-balancer-controller --role-name AmazonEKSLoadBalancerControllerRole --attach-policy-arn=arn:aws:iam::626072240565:policy/AWSLoadBalancerControllerIAMPolicy --approve --region=us-west-2


We have successfully created the service account for Load Balancer.
8.1 Install Helm
Install Helm package manager on the EC2 instance:
sudo snap install helm --classic
8.2 Install ALB Controller
Use Helm to install the AWS Load Balancer Controller for managing Application Load Balancers:
 helm repo add eks https://aws.github.io/eks-charts
 helm repo update
 helm install aws-load-balancer-controller eks/aws-load-balancer-controller -n kube-system -
To see if my ALB is running or not, we will use the following command:
kubectl get deployment -n kube-system aws-load-balancer-controller
Step 9: Deploy Ingress Controller for Internal Routing
9.1 Install Ingress Controller
Navigate to the
/k8s_manifests/full_stack_lb.yamlfile in your repository.Use
kubectlto create the Ingress controller:kubectl apply -f /path/to/full_stack_lb.yaml
Step 10: Map Domain
10.1 Map Domain to ALB En
dpoint
Suppose your domain is
example.com. Navigate to your domain registrar's website (e.g., GoDaddy).Access the DNS management section for your domain.
Create a new CNAME record with the following details:
Type: CNAME
Name: challenge (or any desired subdomain)
Value: <ALB DNS name> (e.g., k8s-workshop-mainlb-7f430e3450-1036210311.us-east-1.elb.amazonaws.com)
TTL: Custom, set to 600 seconds.
  Type: CNAME
  Name: challenge
  Value: k8s-workshop-mainlb-7f430e3450-1036210311.us-east-1.elb.amazonaws.com
  TTL: Custom >> 600 seconds.
Step 11: Verify Deployment
11.1 Check Load Balancers
Navigate to the AWS Management Console.
Go to EC2 > Load Balancers.
Search for the Load Balancer associated with your deployment (e.g., search for "challenge" or "k8s-workshop-mainlb").
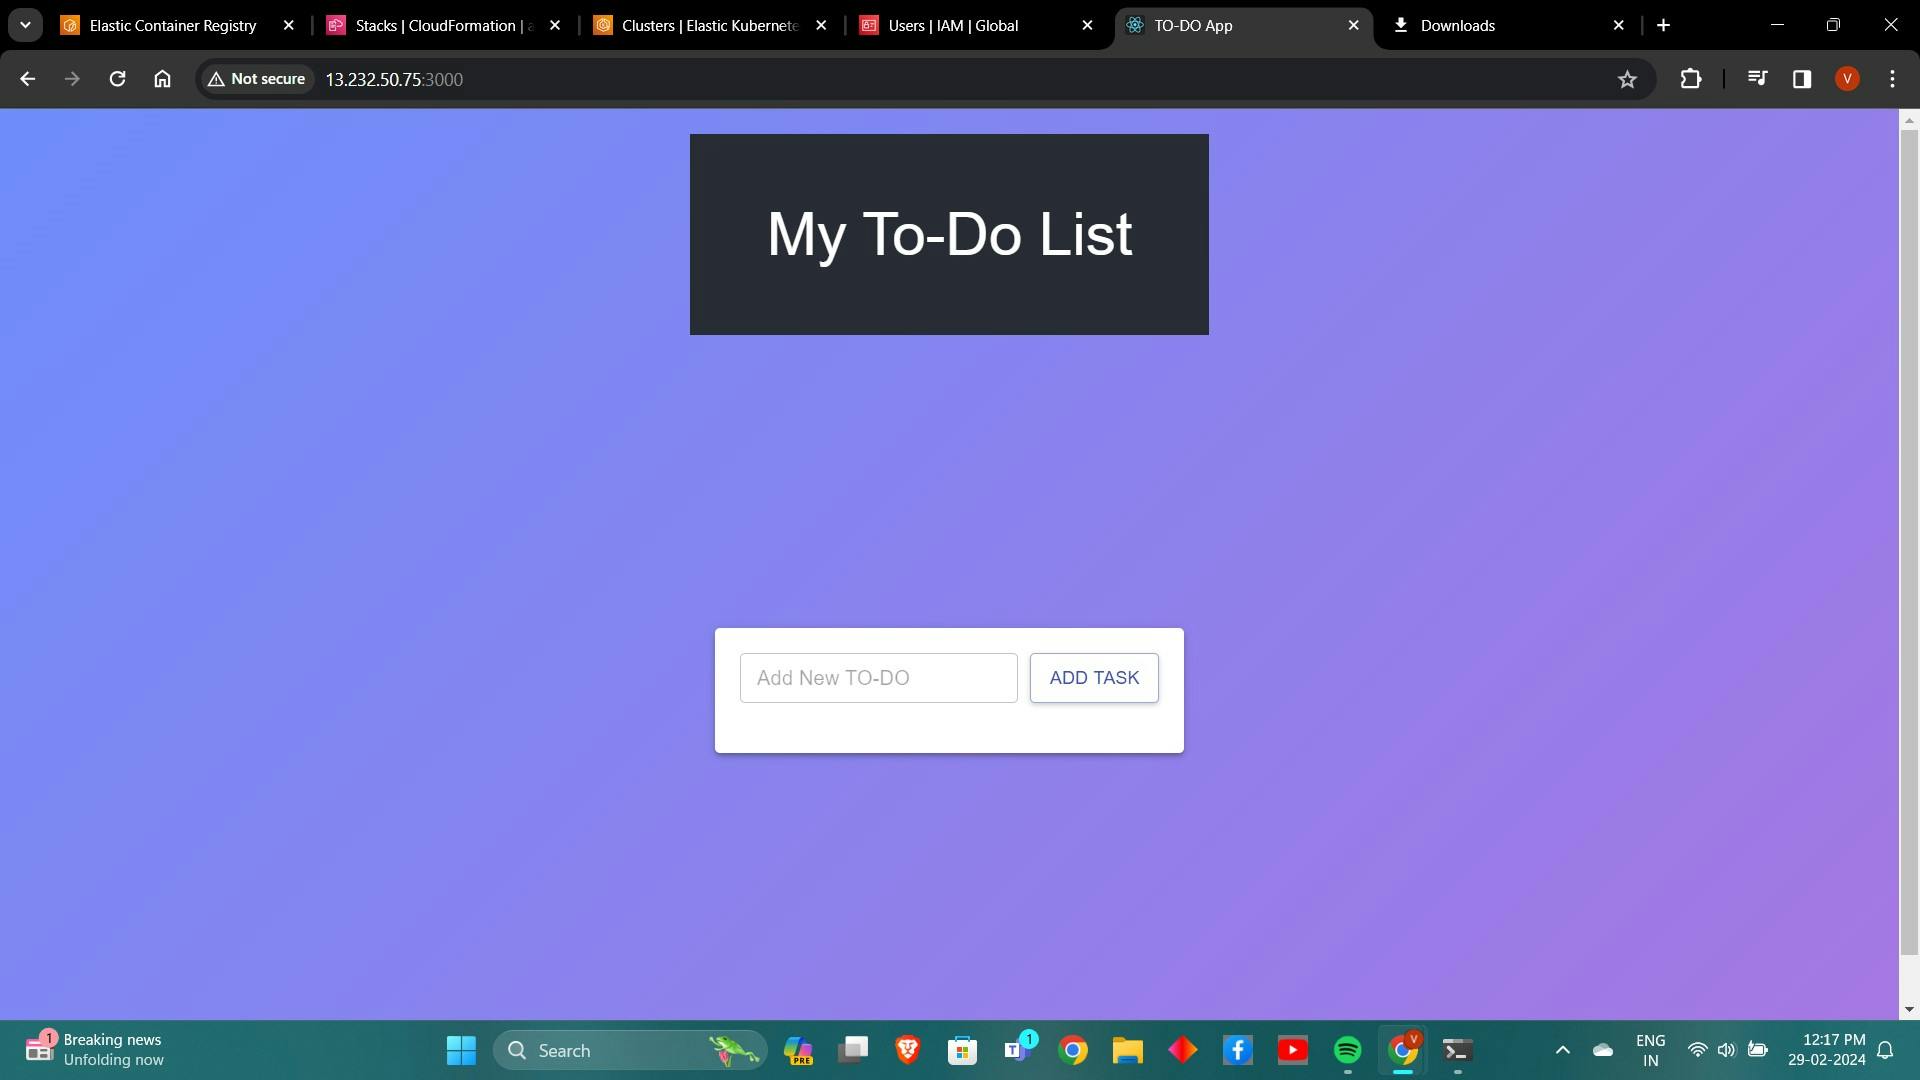
11.2 Access the Application
Open a web browser and navigate to
http://challenge.example.com(replaceexample.comwith your domain).Verify that you can access the deployed application successfully.
Step 12: Clean Up
12.1 Delete EKS Cluster
Delete the Amazon EKS cluster when you're done with the project:
eksctl delete cluster --name three-tier-cluster --region ap-south-1
Happy deploying!